In this tutorial we are going to build a basic Spring Web App, that will output Hello World!
I'm going to split this tutorial into four separate sub-sections, so that it'll be easily to follow on. I would manually change a Dynamic Web Project into a Maven Web Project.


I'm going to split this tutorial into four separate sub-sections, so that it'll be easily to follow on. I would manually change a Dynamic Web Project into a Maven Web Project.
Setting up your project
Create the Dynamic Web Project and tick the check box "Generate Deployment Descriptor". This is how your project directory will look like.
Next, convert your Web Project into a Maven Project. Select the project directory and right click, and follow the image below.
 |
| Web Project convert to Maven Project |
 |
| POM.XML file creation |
Specify, the group id and the artifact id for the pom.xml file. You can type your own names for the group id and the artifact id. After the creation of the pom.xml file your can see it listed on the project directory.
I assume that the Spring IDE and the Maven Integration for Eclipse plugins are installed in Eclipse.
Open the POM.XML file and go to "Dependencies" tab and click on "Add" to add maven dependencies to your project. For some reason you cannot search for maven dependencies. So you'll have to do the log way.
Go to http://mvnrepository.com/ and search and add the below mentioned dependencies.
- Spring-core 3.2.3.RELEASE
- Spring-beans 3.2.3.RELEASE
- Spring-context 3.2.3.RELEASE
- Spring-web 3.2.3.RELEASE
- Spring-webmvc 3.2.3.RELEASE
 | ||
| Adding spirng-core dependency using pom.xml interface |
After adding all the dependencies, right click the project, go to Maven tab and click on "Update Project".
 |
| Project directory after adding all the dependencies |
Some dependencies were previous downloaded, that's the reason it's being listed on to the above project directory.
Sometimes, Eclipse removes maven dependency path from the deployment assembly, we need maven directory in our deployment assembly. To do this, right click on the project, go to properties section and browse to "Deployment Assembly" tab and click on "Add" and click on "Java Build Path Entries" and "Maven Dependencies".
 |
| Web Deployment Assembly after adding the Maven Dependency Path |
Adding a Dispatcher Servlet
A dispatcher servlet takes the incoming requests and finds the appropriate handler to handle that particular request and to return a response to the user. The dispatcher servlet sits in between the user's request and the controller.

Let's get up and code, to add the dispatcher servlet to the project do the following steps:
- Select the project and add a new servlet. Do not forget to tick the checkbox "Use an existing Servlet class or JSP".

To use the class DispatcherServlet we need to have the spring-webmvc maven dependency.
2. Open the web.xml file set the display name, servlet name, url pattern and configure the load on startup.
<?xml version="1.0" encoding="UTF-8"?>
<web-app xmlns:xsi="http://www.w3.org/2001/XMLSchema-instance" xmlns="http://xmlns.jcp.org/xml/ns/javaee" xsi:schemaLocation="http://xmlns.jcp.org/xml/ns/javaee http://xmlns.jcp.org/xml/ns/javaee/web-app_3_1.xsd" id="WebApp_ID" version="3.1">
<display-name>WebApp</display-name>
<welcome-file-list>
<welcome-file>index.html</welcome-file>
<welcome-file>index.htm</welcome-file>
<welcome-file>index.jsp</welcome-file>
<welcome-file>default.html</welcome-file>
<welcome-file>default.htm</welcome-file>
<welcome-file>default.jsp</welcome-file>
</welcome-file-list>
<servlet>
<description></description>
<display-name>school</display-name>
<servlet-name>school</servlet-name>
<servlet-class>org.springframework.web.servlet.DispatcherServlet</servlet-class>
</servlet>
<load-on-startup>1</load-on-startup>
<servlet-mapping>
<servlet-name>school</servlet-name>
<url-pattern>/</url-pattern>
</servlet-mapping>
</web-app>
- Load on startup - We have to specify load on startup, to load this dispatcher servlet on startup. It takes in integer values starting, value 0 has the highest priority.
3. Create a spring bean configuration file that contains all the configurations for Spring MVC.This can handle web requests, data binding, request mapping and view resolving. Note that this file should be created under the WEB-INF directory and must follow a pattern like : nameOfDispatcherServlet-servlet.xml
 |
| Spring Bean Configuration File |
Adding a Controller
Here are the steps to add and configure the controller.
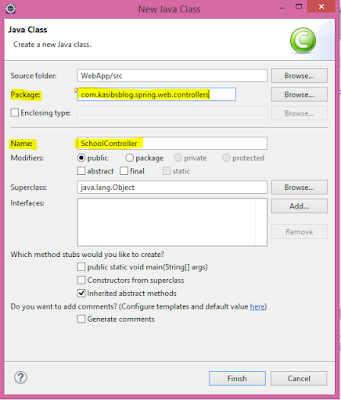
1. Add a controller class under the java resources directory. Give it a package name and a class name.
2. Say the controller to return the index page if the request is the context path(/).
package com.kasibsblog.spring.web.controllers;
import org.springframework.stereotype.Controller;
import org.springframework.web.bind.annotation.RequestMapping;
@Controller
public class SchoolController {
@RequestMapping("/")
public String showIndexPage(){
return "index";
}
}
The "Controller" annotation specifies that this class in a controller class, "RequestMapping" specifies what view to return for specific user request.
In our example, the showIndexPage() method returns the index page if we go to the project root, that is "/" .
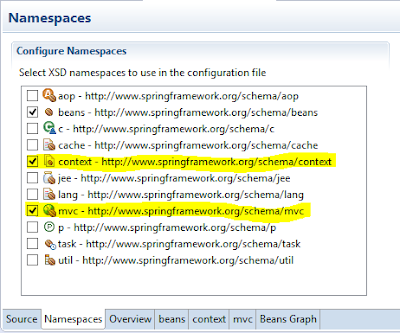
3. Load the controller package to the spring bean configuration context file - school-context.xml

Add the context and mvc namespace in the Namespaces tab in school-context.xml file.

Go to the "Context" tab and add the annotation config element and the component scan element, in component scan add the package name of the controller class to the base package attribute.
This adds the controller class to the Spring context configuration file. Finally, to finish of this section, open up the "MVC" tab and add the mvc-annotation-driven element. This is needed for the "Controller" annotation to work.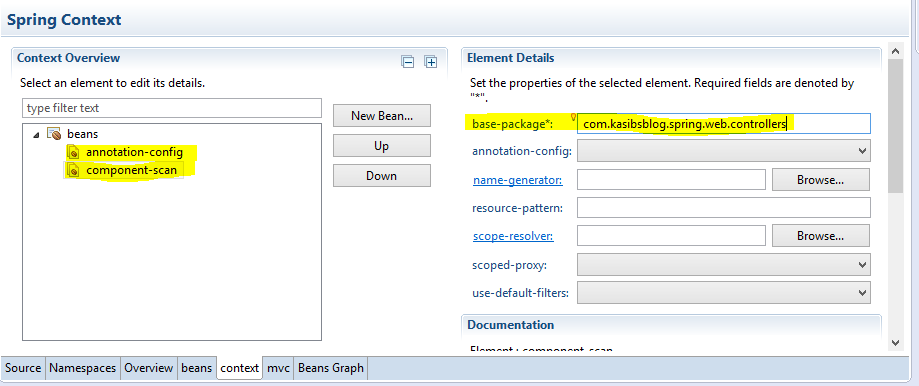

Your school-context.xml file source will look like,

Adding a View
1. Create a folder under WEB-INF folder, called as jsps. Add a new jsp file to the jsps folder and name the jsp file as index.jsp. Type the text "Hello World Index Page!!"

 |
| index.jsp page |
2. Now, create a View Resolver bean in the school-servlet.xml file.

This creates a new bean with id "jspViewResolver" you can give your own id, class should be "InternalResourceViewResolver". Check the above image for the fully qualified name.
3. Add the prefix and suffix properties for the jspViewResolver bean and set it's values.
 |
| adding a bean property element |
 |
| adding prefix property |
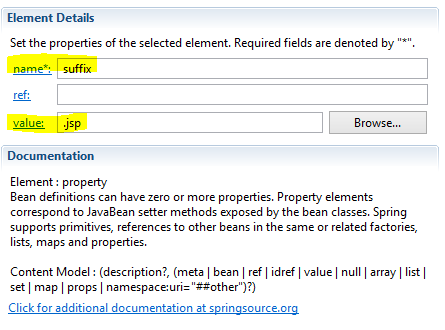 |
| suffix property |
We are almost finished, to make sure every thing is working correctly, run the application and it should return a page like this:

Congratulations, you've successfully completed a basic Spring MVC Web application.