Friday, November 20, 2015

AngularJS and SPAs


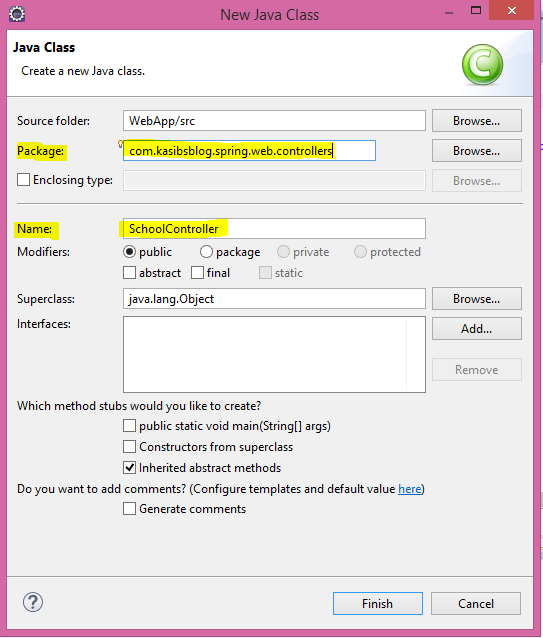
AngularJS is MVW or MV*  or MVVM framework to develop large scale enterprise applications. AngularJS is a buzz word for modern web developers and some business specifically hire AngularJS developers.

It has made the front-end web development easier than ever with loads of cool features.

What does MVW means?


MVW - Model View Whatever. "Whatever" can thought as "Controller" in MVC, but in AngularJS this does mean that,

Whatever = Watch and Digest Loop in AngularJS

Here are some good resources to learn more about Watch and Digest Loop:

Benefits of SPAs

We can move around the web site without reloading it, just like our old school standalone desktop apps. AngularJS uses the hash or the pound symbol (#) to build up SPAs.


Let's look how we can build Single Page Application using AngularJS


Project Directory


angularmain.js

 
var firstApp = angular.module('firstApp', ['ngRoute']);

//route configurations
firstApp.config(function ($routeProvider) {
    $routeProvider
        .when('/', {
            templateUrl: 'webpages/home.html',
            controller: 'homeController',
        })
        .when('/about', {
            templateUrl: 'webpages/about.html',
            controller: 'aboutController',
        });
});


// controllers
firstApp.controller('homeController', ['$scope', function ($scope) {

    $scope.name = 'From Home Controller';

}]);

firstApp.controller('aboutController', ['$scope', function ($scope) {

    $scope.name = 'From About Controller';


}]);

firstApp.controller('mainController', ['$scope', '$location', function ($scope, $location) {

    // sets the active style for the navbar elements
    $scope.isActive = function (viewLocation) {
        return viewLocation === $location.path();
    };

}]);

Angular module is a where angular is initialized. Route Configurations enables us to implement SPAs where we are specifying the url, templateUrl - physical location of the webpage for the url, and it's associated controller.

In our example, "/" refers to the home or the index page which is the url, 'webpages/home.html' the home.html is located inside of webpages folder and "homeController" is it's controller responsible for it.

The scope object is only visible to it's respective controller. Ex: $scope.name in homeController and aboutController are different.


template.html

 
<!DOCTYPE html>
<html lang="en" ng-app="firstApp">

<head>
    <meta charset="utf-8">
    <meta http-equiv="X-UA-Compatible" content="IE=edge">
    <meta name="viewport" content="width=device-width, initial-scale=1">
    <!-- The above 3 meta tags *must* come first in the head; any other head content must come *after* these tags -->
    <title>AngularJS and SPAs</title>

    <!-- Bootstrap -->
    <link href="css/bootstrap.min.css" rel="stylesheet">

    <!-- HTML5 shim and Respond.js for IE8 support of HTML5 elements and media queries -->
    <!-- WARNING: Respond.js doesn't work if you view the page via file:// -->
    <!--[if lt IE 9]>
      <script src="https://oss.maxcdn.com/html5shiv/3.7.2/html5shiv.min.js"></script>
      <script src="https://oss.maxcdn.com/respond/1.4.2/respond.min.js"></script>
    <![endif]-->
</head>

<body>
    <nav class="navbar navbar-default">
        <div class="container-fluid">
            <div class="navbar-header">
                <button type="button" class="navbar-toggle collapsed" data-toggle="collapse" data-target="#app1" aria-expanded="false">
                    <span class="sr-only">Toggle navigation</span>
                    <span class="icon-bar"></span>
                    <span class="icon-bar"></span>
                    <span class="icon-bar"></span>
                </button>
                <a class="navbar-brand" href="#/">
                    <span>AngularJS and SPAs</span>
                </a>
            </div>
            <div class="collapse navbar-collapse" id="app1" ng-controller="mainController">
                <ul class="nav navbar-nav navbar-left">
                    <li ng-class="{ active: isActive('/')}"><a href="#/">Home</a></li>
                    <li ng-class="{ active: isActive('/about')}"><a href="#/about">About</a></li>
                </ul>
            </div>
        </div>
    </nav>

    <div class="container" ng-controller="homeController">
        <div class="row">
            <div ng-view></div>
        </div>
    </div>


    <!-- jQuery (necessary for Bootstrap's JavaScript plugins) -->
    <script src="https://ajax.googleapis.com/ajax/libs/jquery/1.11.3/jquery.min.js"></script>
    <!-- Include all compiled plugins (below), or include individual files as needed -->
    <script src="js/bootstrap.min.js"></script>

    <!-- AngularJS Scripts -->
    <script src="//code.angularjs.org/1.4.7/angular.min.js"></script>
    <script src="//code.angularjs.org/1.4.7/angular-route.min.js"></script>

    <!-- External JS -->
    <script src="js/angularmain.js"></script>

</body>
</html>
The index page serves as the template page for the application. There are three AngularJS "custom attributes" used here:

  • ng-app - Specifies the angular module
  • ng-controller - the controller for the index page and what page of the page will it                            control
  • ng-view - This takes the view from the angular route configurations

home.html

 
<div class="form-group">
  <label for="inputBox">Text from Controller </label>
  <input type="text" class="form-control" id="inputBox" ng-model="name">
</div>
 
Gets the ng-model from the "homeController", ng-model is an angular directive and it is two way binding element. The term two way binding means that when the HTML is changed it automatically changes the Javascript and vice-versa.


about.html

 
<div class="form-group">
    <label for="inputBox">Text from Controller </label>
    <input type="text" class="form-control" id="inputBox" ng-model="name">
</div>


Final Result


Home Page

About Page


Further References and Tutorials


Sunday, October 11, 2015

Basic Spring Web Application

In this tutorial we are going to build a basic Spring Web App, that will output Hello World!
I'm going to split this tutorial into four separate sub-sections, so that it'll be easily to follow on. I would manually change a Dynamic Web Project into a Maven Web Project.  

Setting up your project

 Create the Dynamic Web Project and tick the check box "Generate Deployment Descriptor". This is how your project directory will look like.

 Next, convert your Web Project into a Maven Project. Select the project directory and right click, and follow the image below.

 
Web Project convert to Maven Project

POM.XML file creation
 Specify, the group id and the artifact id for the pom.xml file. You can type your own names for the group id and the artifact id. After the creation of the pom.xml file your can see it listed on the project directory.

I assume that the Spring IDE and the Maven Integration for Eclipse plugins are installed in Eclipse.

Open the POM.XML file and go to "Dependencies" tab and click on "Add" to add maven dependencies to your project. For some reason you cannot search for maven dependencies. So you'll have to do the log way. 

Go to http://mvnrepository.com/ and search and add the below mentioned dependencies.
  • Spring-core 3.2.3.RELEASE
  • Spring-beans 3.2.3.RELEASE
  • Spring-context 3.2.3.RELEASE
  • Spring-web 3.2.3.RELEASE
  • Spring-webmvc 3.2.3.RELEASE
 
 
Adding spirng-core dependency using pom.xml interface

 After adding all the dependencies, right click the project, go to Maven tab and click on "Update Project".

Project directory after adding all the dependencies

 Some dependencies were previous downloaded, that's the reason it's being listed on to the above project directory.

 Sometimes, Eclipse removes maven dependency path from the deployment assembly, we need maven directory in our deployment assembly. To do this, right click on the project, go to properties section and browse to "Deployment Assembly" tab and click on "Add" and click on "Java Build Path Entries" and "Maven Dependencies".

Web Deployment Assembly after adding the Maven Dependency Path

Adding a Dispatcher Servlet


A dispatcher servlet takes the incoming requests and finds the appropriate handler to handle that particular request and to return a response to the user. The dispatcher servlet sits in between the user's request and the controller.


Let's get up and code, to add the dispatcher servlet to the project do the following steps:

  1. Select the project and add a new servlet. Do not forget to tick the checkbox "Use an existing Servlet class or JSP".


To use the class DispatcherServlet we need to have the spring-webmvc maven dependency.

    2. Open the web.xml file set the display name, servlet name, url pattern and configure the load on startup.


<?xml version="1.0" encoding="UTF-8"?>
<web-app xmlns:xsi="http://www.w3.org/2001/XMLSchema-instance" xmlns="http://xmlns.jcp.org/xml/ns/javaee" xsi:schemaLocation="http://xmlns.jcp.org/xml/ns/javaee http://xmlns.jcp.org/xml/ns/javaee/web-app_3_1.xsd" id="WebApp_ID" version="3.1">
  <display-name>WebApp</display-name>
  <welcome-file-list>
    <welcome-file>index.html</welcome-file>
    <welcome-file>index.htm</welcome-file>
    <welcome-file>index.jsp</welcome-file>
    <welcome-file>default.html</welcome-file>
    <welcome-file>default.htm</welcome-file>
    <welcome-file>default.jsp</welcome-file>
  </welcome-file-list>
  <servlet>
    <description></description>
    <display-name>school</display-name>
    <servlet-name>school</servlet-name>
    <servlet-class>org.springframework.web.servlet.DispatcherServlet</servlet-class>
  </servlet>
 <load-on-startup>1</load-on-startup>
  <servlet-mapping>
    <servlet-name>school</servlet-name>
    <url-pattern>/</url-pattern>
  </servlet-mapping>
</web-app>

  • Load on startup - We have to specify load on startup, to load this dispatcher servlet on startup. It takes in integer values starting, value 0 has the highest priority. 

     
    3. Create a spring bean configuration file that contains all the configurations for Spring MVC.This can handle web requests, data binding, request mapping and view resolving. Note that this file should be created under the WEB-INF directory and must follow a pattern like : nameOfDispatcherServlet-servlet.xml

Spring Bean Configuration File

Adding a Controller

Here are the steps to add and configure the controller.

          1. Add a controller class under the java resources directory. Give it a package name and a class name.


          2. Say the controller to return the index page if the request is the context path(/). 

package com.kasibsblog.spring.web.controllers;

import org.springframework.stereotype.Controller;
import org.springframework.web.bind.annotation.RequestMapping;

@Controller
public class SchoolController {
@RequestMapping("/")
public String showIndexPage(){
return "index";
}

}

The "Controller" annotation specifies that this class in a controller class, "RequestMapping" specifies what view to return for specific user request.

In our example, the showIndexPage() method returns the index page if we go to the project root, that is "/" .


          3. Load the controller package to the spring bean configuration context file - school-context.xml


Add the context and mvc namespace in the Namespaces tab in school-context.xml file.


Go to the "Context" tab and add the annotation config element and the component scan element, in component scan add the package name of the controller class to the base package attribute. 

This adds the controller class to the Spring context configuration file. Finally, to finish of this section, open up the "MVC" tab and add the mvc-annotation-driven element. This is needed for the "Controller" annotation to work.


Your school-context.xml file source will look like,


Adding a View 

        1. Create a folder under WEB-INF folder, called as jsps. Add a new jsp file to the jsps folder and name the jsp file as index.jsp. Type the text "Hello World Index Page!!"


index.jsp page

          2. Now, create a View Resolver bean in the school-servlet.xml file. 


This creates a new bean with id "jspViewResolver" you can give your own id, class should be "InternalResourceViewResolver". Check the above image for the fully qualified name.

          3. Add the prefix and suffix properties for the jspViewResolver bean and set it's values.

adding a bean property element

adding prefix  property

suffix property

We are almost finished, to make sure every thing is working correctly, run the application and it should return a page like this: 


Congratulations, you've successfully completed a basic Spring MVC Web application. 


Tuesday, September 15, 2015

Autowiring using Annotations


In one of my previous post I talked about XML based autowiring. Was it a hassel to configure it? If yes, then we'll look an easier way to our autowire the beans - Autowiring using Annotation.

Autowiring using Annotation can be done using several annotation methods, they are :
  • Autowired
  • Resource
  • Inject

Here we are going to discuss Autowired annotation and some other annotations. 

What's this annotation?

Annotation is a like a specifier and there are many annotations specifiers provided by Java. A basic annotation can be "@Override" specifier. 


Setting up annotation 


View the classes, interfaces and the XML configuration files used in this example


To use the annotation we'll need to add the following code to the existing configuration file. 

This code should be added to the beans tag as follows:

xmlns:context="http://www.springframework.org/schema/context"

This adds the context namespace to the XML file.

The schema location parameter too needs to be changed as follows: 

xsi:schemaLocation="http://www.springframework.org/schema/beans http://www.springframework.org/schema/beans/spring-beans.xsd
        http://www.springframework.org/schema/context http://www.springframework.org/schema/context/spring-context-4.1.xsd"

The section which is highlighted is the new addition to the schema location parameter.

Finally, this last piece of code is also required to set up annotations successfully.

<context:annotation-config></context:annotation-config>

It should be added in between the beans tag.


Autowired Annotation


Here comes the long awaited section, using annotation we can reduce the XML configuration time and it's some times boring for developers to configure things up. Now let's go to the code.

package com.kasibsblog.spring.test;

import org.springframework.beans.factory.annotation.Autowired;

public class AbCompany {

    private FullTimeEmployee fulltime;
    private PartTimeEmployee parttime;

    @Autowired
    public void setFulltime(FullTimeEmployee fulltime) {
        this.fulltime = fulltime;
    }

    @Autowired
    public void setParttime(PartTimeEmployee parttime) {
        this.parttime = parttime;
    }

    public void printFullTime(String name, int salary, String company) {
        fulltime.print(name, salary, company);
    }

    public void printPartTime(String name, int salary, String company) {
        parttime.print(name, salary, company);
    }

    
In the above example, the autowired annotation is placed before the setter method, this is one way of placing the autowired annotation. We can even set the annotation to only the properties, constructor or we can mix the setter methods, properties and/or the constructor. Even we can eliminate the setter methods and constructor.

Now, we'll look how we can mix single argument constructor with a property.

 
package com.kasibsblog.spring.test;
import org.springframework.beans.factory.annotation.Autowired;


public class AbCompany {
     

    @Autowired
    private FullTimeEmployee fulltime;
    private PartTimeEmployee parttime;


    @Autowired
    public AbCompany(PartTimeEmployee parttime){
        this.partttime = parttime;
    }
    public void printFullTime(String name, int salary, String company) {
        fulltime.print(name, salary, company);
    }

    public void printPartTime(String name, int salary, String company) {
        parttime.print(name, salary, company);
    }


Wednesday, September 9, 2015

How to deal with Ambiguities in Autowiring - Spring

In the last post - Autowiring in Spring we discussed Autowirirng and different methods of doing it. Also I gave an introduction to ambiguities in autowiring, so this tutorial is a continuation of it. 

Here I will discuss two other ways we can deal with the ambiguity in autowiring.

1. Autowiring Candidate property


 Autowiring candidate is a way to turn on or turn off autowiring of a bean and it is set per bean. Autowiring-candidate property has several choices : 
  • true - If it is set to true, then it can wire with the other bean.
  • false - If it is set to false, then it autowiring is totally prohibited.
  • default -  This is the default value set and can be considered to autowire.
Now, let's look at our sample code.

<?xml version="1.0" encoding="UTF-8"?>
<beans xmlns="http://www.springframework.org/schema/beans"
    xmlns:xsi="http://www.w3.org/2001/XMLSchema-instance"
    xmlns:p="http://www.springframework.org/schema/p"
    xsi:schemaLocation="http://www.springframework.org/schema/beans http://www.springframework.org/schema/beans/spring-beans.xsd"
    default-autowire="byType">

    <bean id="abcompany" class="com.kasibsblog.spring.test.AbCompany">
    </bean>

    <bean name="parttime" class="com.kasibsblog.spring.test.PartTimeEmployee">
    </bean>
   
    <bean name="parttime2"
        class="com.kasibsblog.spring.test.PartTimeEmployee"
        autowire-candidate="false">
    </bean>

    <bean name="fulltime"
        class="com.kasibsblog.spring.test.FullTimeEmployee">

</bean>
</beans>


The bean with id - parttime2, cannot be autowired and it is prohibited. If the autowire-candidate property was set to either default or true, the program will throw an exception as the autowiring method is set to byType.


2. Primary property


Primary property is another technique to overcome ambiguity in autowiring. We can set the primary property to either true or false. Unlike the autowiring-candidate property set to false, primary does not totally prohibit it from autowiring only the preference level is set by it.

Let me now explain this by an example,

<?xml version="1.0" encoding="UTF-8"?>
<beans xmlns="http://www.springframework.org/schema/beans"
    xmlns:xsi="http://www.w3.org/2001/XMLSchema-instance"
    xmlns:p="http://www.springframework.org/schema/p"
    xsi:schemaLocation="http://www.springframework.org/schema/beans http://www.springframework.org/schema/beans/spring-beans.xsd"
    default-autowire="byType">

    <bean id="abcompany" class="com.kasibsblog.spring.test.AbCompany">
    </bean>

    <bean name="parttime" class="com.kasibsblog.spring.test.PartTimeEmployee">
    </bean>
   
    <bean name="parttime2"
        class="com.kasibsblog.spring.test.PartTimeEmployee"
        autowire-candidate="false">
    </bean>

    <bean name="fulltime"
        class="com.kasibsblog.spring.test.FullTimeEmployee"

        primary="true">
</bean>

<bean name="fulltime2"
        class="com.kasibsblog.spring.test.FullTimeEmployee">

</bean>
</beans>

In the above sample code, we have two beans of type - FullTimeEmploye, I had set the bean - fulltime to be my primary bean to autowire. This does not mean that fulltime2 is totally prohibited from autowiring. It can be autowired with other beans.


Tuesday, September 8, 2015

Autowiring in Spring

Autowiring is a technique to wire the beans together. Specially, when there are many dependencies, all of the dependencies can be  managed easily using Autowiring.

Autowiring can be performed in several methods, here are the following methods it can be done:
  1. byType
  2. byName
  3. constructor
  4. default
We can use the autowiring property of the bean to set the autowiring method.

In this example we are going to use the following classes, interface and XML file.

Employee - Interface

package com.kasibsblog.spring.test;

public interface Employee {
   
    public void print(String name, int salary, String company);

}

FullTimeEmployee - Class

package com.kasibsblog.spring.test;

public class FullTimeEmployee implements Employee {

    public void print(String name, int salary, String company) {
        System.out.println("Company : " + company + ", " + "Name : " + name + ", " + "Salary : " + salary + ",  "+ "Type : Full-Time");
    }

}

PartTimeEmployee - Class

package com.kasibsblog.spring.test;

public class PartTimeEmployee implements Employee {

    public void print(String name, int salary, String company) {
        System.out.println("Company : " + company + ", " + "Name : " + name + ", " + "Salary : " + salary + ", "
                + "Type : Part-Time");
    }
}

AbCompany - Class

package com.kasibsblog.spring.test;

public class AbCompany {

    private FullTimeEmployee fulltime;
    private PartTimeEmployee parttime;
 
    public void setFulltime(FullTimeEmployee fulltime) {
        this.fulltime = fulltime;
    }

    public void setParttime(PartTimeEmployee parttime) {
        this.parttime = parttime;
    }
   
    public void printFullTime(String name, int salary, String company){
        fulltime.print(name, salary, company);
    }
   
    public void printPartTime(String name, int salary, String company){
        parttime.print(name, salary, company);
    }

}

Main - Class

package com.kasibsblog.spring.test;

import org.springframework.context.ApplicationContext;
import org.springframework.context.support.ClassPathXmlApplicationContext;

public class App {

    public static void main(String[] args) {

        ApplicationContext context = new ClassPathXmlApplicationContext("com/kasibsblog/spring/test/beans/beans.xml");
       
        AbCompany abcompany= (AbCompany) context.getBean("abcompany");
        abcompany.printFullTime("Sue", 12000, "Ab Company");
        abcompany.printPartTime("Mary", 10000, "Ab Company");

        ((ClassPathXmlApplicationContext) context).close();
    }

}

beans.xml  

<?xml version="1.0" encoding="UTF-8"?>
<beans xmlns="http://www.springframework.org/schema/beans"
    xmlns:xsi="http://www.w3.org/2001/XMLSchema-instance"
    default-init-method="init" default-destroy-method="destroy"
    xmlns:p="http://www.springframework.org/schema/p"
    xsi:schemaLocation="http://www.springframework.org/schema/beans http://www.springframework.org/schema/beans/spring-beans.xsd">


    <bean id="abcompany" class="com.kasibsblog.spring.test.AbCompany">
    </bean>

    <bean id="partTime" class="com.kasibsblog.spring.test.PartTimeEmployee">
    </bean>
   
    <bean id="fullTime" class="com.kasibsblog.spring.test.FullTimeEmployee">
    </bean>

</beans>

Now let's look at different modes of autowiring.

1. byType

Autowiring is done by using the data-type. It tries to match exactly a bean per data-type, if it finds more than a bean of the same type then an exception is thrown, also known as "Autowiring ambiguity".

  <bean id="abcompany" class="com.kasibsblog.spring.test.AbCompany" autowiring="byType">
  </bean>

 Assume that there are two beans of FullTimeEmployee as:

<bean id="fullTime" class="com.kasibsblog.spring.test.FullTimeEmployee">
</bean>

<bean id="fullTime2" class="com.kasibsblog.spring.test.FullTimeEmployee">
 </bean>

In this case, an exception would be thrown.

2. byName

Autowiring byName uses the the bean name or the bean id to wire the beans together.

<bean id="abcompany" class="com.kasibsblog.spring.test.AbCompany" autowiring="byName">
</bean>

<bean id="fullTime" class="com.kasibsblog.spring.test.FullTimeEmployee">
</bean>

<bean name="partTime" class="com.kasibsblog.spring.test.PartTimeEmployee">
</bean>

3. constructor

<bean id="abcompany" class="com.kasibsblog.spring.test.AbCompany" autowiring="constructor">
</bean>

The abcompany bean autowiring property is now set to constructor. The ABCompany class should include a two argument constructor, for this example.

public AbCompany(FullTimeEmployee fulltime, PartTimeEmployee parttime){
        this.fulltime = fulltime;
        this.parttime = parttime;
    }

The beans should match both the arguments specified in the in the constructor, otherwise it will thrown an error.

Assume that the bean with id - fulltime, has the class set to AbCompany. This will result an ambiguity as the abcompany been autowired by constructor.

<bean id="fullTime" class="com.kasibsblog.spring.test.AbCompany">
</bean>

4. default

Spring allows us to set a default autowiring which will be activated for the specified XML configuration file.

The default autowiring should be added to the beans tag in the configuration file, not the bean tag

<beans xmlns="http://www.springframework.org/schema/beans"
    xmlns:xsi="http://www.w3.org/2001/XMLSchema-instance"
    xmlns:p="http://www.springframework.org/schema/p"
    xsi:schemaLocation="http://www.springframework.org/schema/beans        http://www.springframework.org/schema/beans/spring-beans.xsd"
    default-autowire="byType">

</beans>

In the above sample code, I have selected the default autowiring method as byType. We can also specify any one of the above discussed methods.

Moreover, assume that there are two beans that belongs to FullTimeEmployee class. For example,

<bean name="fulltime" class="com.kasibsblog.spring.test.FullTimeEmployee">
 </bean>

<bean name="fulltime2" class="com.kasibsblog.spring.test.FullTimeEmployee">
</bean>

In this case, an exception would be thrown since that Spring cannot detect which bean to select from the two beans. In order to eliminate this ambiguity we can specify what bean should be used to wire with the "abcompany" bean.

We can achieve this by using the default-autowing-candidates property of the beans tag.

<beans xmlns="http://www.springframework.org/schema/beans"
    xmlns:xsi="http://www.w3.org/2001/XMLSchema-instance"
    xmlns:p="http://www.springframework.org/schema/p"
    xsi:schemaLocation="http://www.springframework.org/schema/beans http://www.springframework.org/schema/beans/spring-beans.xsd"
    default-autowire="byType" default-autowire-candidates="fulltime,parttime">

</beans>

Here the fulltime and partime beans areselected as the default-autowire-candidates. It is a comma seperated list also note that the list cannot contain any white spaces.

Using wildcards to specify default-autowire-candidates

Wildcards can be used to specify the default candidates, an asterisk(*) is used as the wildcard character.

In our example, both the beans end with "time" - fulltime & parttime. The code can be changed to 

default-autowire-candidates="*time"


Sunday, May 3, 2015

JSP - Beans

How to create a bean, set bean values and access bean values

In this example, we are going to create a Shopping Item - bean and access it's values in a JSP page.
Beans allow to share data across multiple JSPs.

ShoppingItem.java - Bean


package com.beans;

// ShoppingItem - bean

public class ShoppingItem {

    private String itemId;
    private String desc;
    private double price;
   
    public String getItemId() {
        return itemId;
    }

    public void setItemId(String itemId) {
        this.itemId = itemId;
    }

    public String getDesc() {
        return desc;
    }

    public void setDesc(String desc) {
        this.desc = desc;
    }

    public double getPrice() {
        return price;
    }

    public void setPrice(double price) {
        this.price = price;
    }
   
}


setItem.jsp 

<%@ page language="java" contentType="text/html; charset=ISO-8859-1"
    pageEncoding="ISO-8859-1"%>
<!DOCTYPE html>
<html>
<head>
<meta http-equiv="Content-Type" content="text/html; charset=ISO-8859-1">
<title>Add Shopping Items</title>
</head>
<body>

<!-- Set bean values -->
    <jsp:useBean id="item1" class="com.beans.ShoppingItem" scope="session"></jsp:useBean>
    <jsp:setProperty property="itemId" name="item1" value="1000"/>
    <jsp:setProperty property="desc" name="item1" value="Samsung S6"/>
    <jsp:setProperty property="price" name="item1" value="700"/>
   
    <p>Bean properties has been set.</p>
   
</body>
</html>


getItem.jsp

 <%@ page language="java" contentType="text/html; charset=ISO-8859-1"
    pageEncoding="ISO-8859-1"%>
<!DOCTYPE html>
<html>
<head>
<meta http-equiv="Content-Type" content="text/html; charset=ISO-8859-1">
<title>Shopping Items</title>
</head>
<body>

    <!-- Get bean values -->
    <jsp:useBean id="item1" class="com.beans.ShoppingItem" scope="session"></jsp:useBean>
    <p>Item ID : <%= item1.getItemId() %></p>
    <p>Item Description : <%= item1.getDesc() %></p>
    <p>Item Price : $<%= item1.getPrice() %></p>
   
   
</body>
</html> 

Notes:

  • The "id" property in the useBean jsp tag should be the same when you set the bean properties as well as when you retrieve the bean values.
  • First run the setItem.jsp file and then the viewItem.jsp file. If not the values in the viewItem.jsp will be null for string and 0.0 for double.

Tools Used:

  • Eclipse Kepler 

    Project Directory
    Output


Saturday, March 28, 2015

JSPs & Servlets Introduction

JSPs & Servlets

Jsp & Servlet are core Java technologies that are used in web development. To start of web development we will need the following tools:
  1. Application Server - Apache Tomcat
  2. An IDE - Eclipse, Netbeans or IntellijIdea ()
  3. Java Runtime Environment (JRE)
Prerequisites:
  1. Basic Java knowledge
  2. HTML (Preferred)
What is Java Server Pages(JSP)?
JSP is a HTML page where java code can be embedded onto it.
Hello World JSP

<%@ page language="java" contentType="text/html; charset=ISO-8859-1"
    pageEncoding="ISO-8859-1"%>
<!DOCTYPE html PUBLIC "-//W3C//DTD HTML 4.01 Transitional//EN" "http://www.w3.org/TR/html4/loose.dtd">
<html>
<head>
<meta http-equiv="Content-Type" content="text/html; charset=ISO-8859-1">
<title>Insert title here</title>
</head>
<body>
    <!--  Expression Tag -->
    <%= "Hello Wolrd" %>
</body>
</html>

Steps to do :
  1. Create a web project
  2. Add a new JSP Page under the Web Content Directory of the project
  3. Copy & Paste the above code 
  4. Save & Select the JSP
  5. Run the JSP
Notes:
  • Assuming that you use Eclipse IDE to run your project.

Tuesday, January 27, 2015

Creating a Class in Java - Part 1

Lets take a look how we can use objects and classes to create a small program using Java.

Assuming the you have installed Eclipse IDE. Eclipse is IDE(Integrated Development Environment) that is used to create Java applications, it is an industry standard tool which is used globally by many software engineers.

Download Link : https://eclipse.org/downloads/packages/eclipse-ide-java-ee-developers/lunasr1a

Open Eclipse and then go to the File-->New-->Java Project-->Enter your project name and click on finish.

Then on the left side you can see the Package Explorer tab and inside that you will find your created project. Right click on the project folder that your created previously.

Click on class:


Next, give the class a name, I had given the Name as Person.


Then you will see your class appearing like this :


In the future tutorials lets look how to add attributes and methods for the Person class.